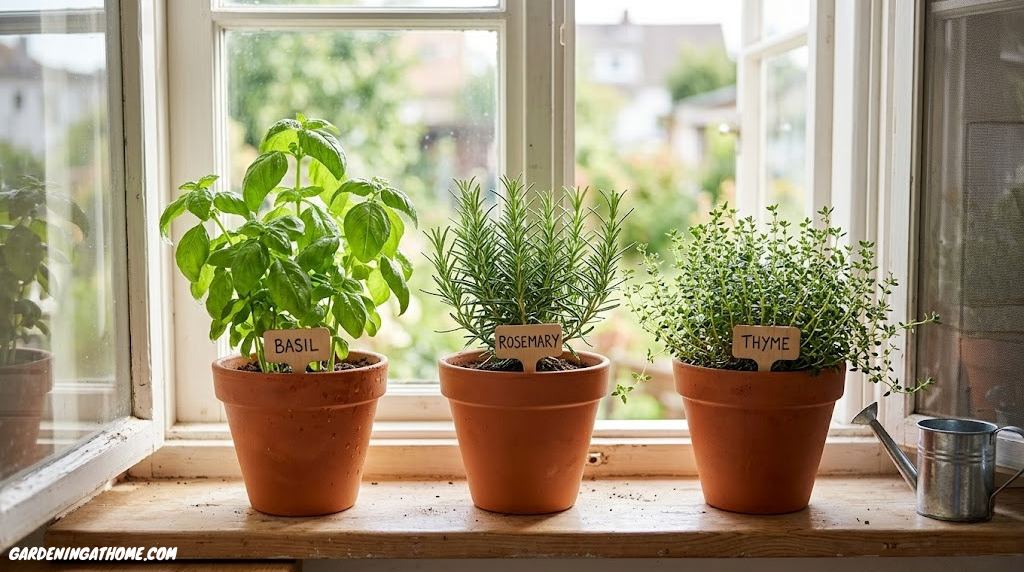
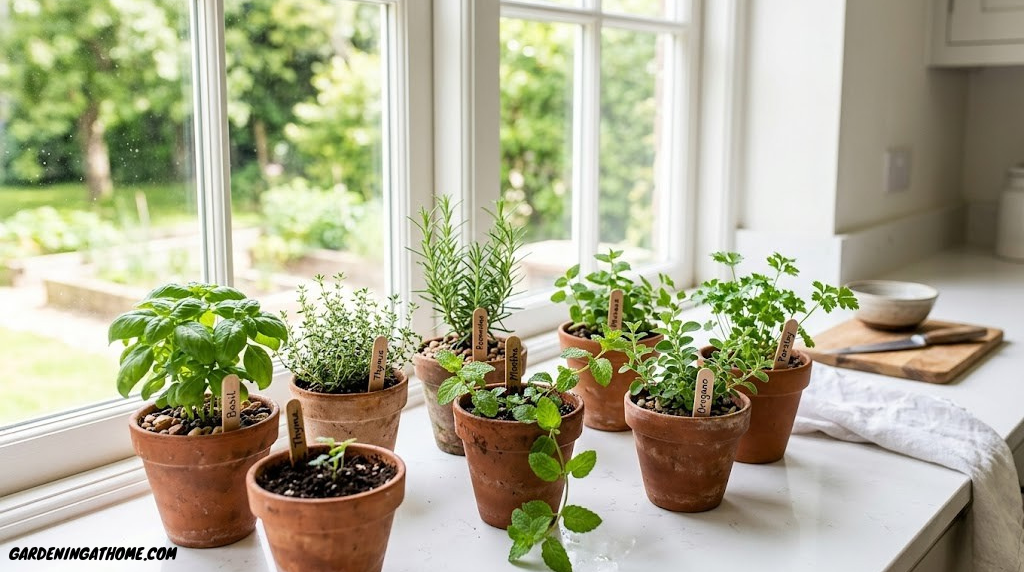
If you’ve ever stood in a grocery store staring at wilted plastic-wrapped herbs and thought, there has to be a better way — you’re right. There is. Growing herbs indoors is one of the most accessible, rewarding, and genuinely useful forms of gardening you can do. You don’t need a yard, a greenhouse, or any prior experience. A sunny windowsill, a handful of pots, and a little patience are genuinely all it takes to get started.
This guide walks you through everything — from choosing your herbs and containers to understanding light, soil, watering rhythms, and harvesting techniques that keep your plants producing for months. Whether you’re setting up a modest three-pot collection on a kitchen shelf or building a full-wall herb display for your apartment, the principles here apply. Let’s start from the very beginning.
Why Grow Herbs Indoors? The Real Reasons
Before we dive into the how, it’s worth pausing on the why — because understanding the genuine advantages of an indoor herb garden shapes how you’ll approach every decision that follows.
The most obvious reason is freshness. Dried herbs from a supermarket have typically been sitting in a warehouse and on a shelf for months. Fresh herbs snipped seconds before use carry a depth of flavor and fragrance that dried versions simply can’t replicate. Basil is the most dramatic example — within hours of harvest, it begins losing the volatile oils that give it that unmistakable summery scent. Having plants at arm’s reach changes the way you cook entirely.
But indoor herb gardening goes beyond cooking. Herbs like lavender, mint, and lemon balm genuinely improve the atmosphere of a room. They filter airborne particles, introduce pleasant scents, and — unlike many indoor plants — reward you with something tangible and useful on a near-daily basis. If you’ve been exploring the best indoor plants for low light, you might be surprised to learn that several herbs, including chives, mint, and parsley, handle moderate light conditions far better than most guides suggest.
✅ Advantages
- Fresh herbs available year-round
- Significantly cheaper than store-bought
- No outdoor space required
- Improves kitchen air quality
- Pest risk much lower than outdoors
- Perfect beginner gardening project
- Herbs grow fast — satisfaction comes quickly
- Can start from seeds, cuttings, or transplants
⚠️ Challenges to Know
- Light is the most common limiting factor
- Overwatering kills more herbs than underwatering
- Indoor conditions can attract fungus gnats
- Some herbs (like dill) don’t love containers
- Requires occasional fertilizing indoors
- Mediterranean herbs need very good drainage
There’s also the economics. A small pot of basil costs roughly the same as a bunch at the supermarket — but the plant will keep producing for months if cared for properly. If you’re interested in exploring more cheap gardening ideas for beginners, indoor herbs consistently rank as the highest-value starting point in terms of cost per harvest.
And for apartment dwellers, indoor herbs often serve as an entry point into gardening more broadly. Many people who’ve read our guide on balcony gardening ideas for apartments started with a windowsill herb setup months earlier. It builds the instincts — reading plants, understanding light, recognizing overwatering — that carry over to everything else.
Best Herbs to Grow Indoors: Choosing the Right Plants
Not every herb thrives equally well indoors. Success depends on matching the herb’s natural preferences to what you can actually provide inside your home — primarily light levels, temperature, and humidity. Here are the herbs that consistently perform best in indoor environments, grouped by how easy they are to manage.
Basil
Loves warmth & full sun. Fast growing. Best near south-facing windows.
Chives
Very forgiving. Handles medium light. Snip and regrow repeatedly.
Mint
Vigorous grower. Thrives in moderate light. Loves moisture. Keep contained.
Parsley
Medium light tolerance. Slow to start but reliable once established.
Thyme
Drought-tolerant. Needs bright light. Perfect for south windowsill.
Rosemary
Slow grower but very long-lived. Needs excellent drainage & full sun.
Oregano
Low-maintenance Mediterranean herb. Full sun, lean soil, infrequent watering.
Cilantro
Bolts quickly indoors. Keep cool & sow successively for steady supply.
Herbs That Are Trickier Indoors
A few herbs are technically possible to grow indoors but require more effort than they’re often worth for beginners: dill grows tall and floppy without significant light, fennel is allelopathic (it inhibits neighboring plants), and tarragon strongly prefers outdoor conditions. If you’re just starting out, skip these until you have a few successful grows under your belt.

Indoor Herb Garden Starter Kit
Everything you need to get 6+ herbs growing from day one — seeds, pots, soil discs, and growing guides included.
Shop on AmazonWhat You’ll Need: Full Equipment Checklist
One of the most reassuring things about indoor herb gardening is that you genuinely don’t need much to start. Below is a tiered checklist — the bare minimum, the sensible setup, and the upgrades worth considering once you’re confident.
| Item | Bare Minimum | Recommended | Worth Upgrading |
|---|---|---|---|
| Containers | Any pot with a drainage hole | Terracotta 4–6″ pots | Self-watering planter set |
| Soil | Basic potting mix | Premium potting mix with perlite | Herb-specific blend with drainage agents |
| Light | South-facing window | South or west window + reflective surface | Full-spectrum LED grow light |
| Seeds/Plants | Store-bought potted herbs | Quality seed packets or nursery starts | Heirloom variety seed collection |
| Watering | Any cup or jug | Small watering can with long spout | Moisture meter for precise watering |
| Fertilizer | Not needed at first | Liquid organic fertilizer (diluted) | Slow-release pellets + liquid feed combo |
| Trays/Saucers | A plate under each pot | Matching drip trays | Humidity trays with pebbles |
If you’re exploring what essential gardening tools beginners actually need, the answer for indoor herbs is refreshingly short: a small trowel, a watering can with a narrow spout, and scissors or snips for harvesting. Everything else is optional.
Choose the Right Location — Light Is Everything
If you take away one insight from this entire guide, let it be this: light is the single most important factor in indoor herb gardening. Almost every other mistake — overwatering, wrong soil, poor growth — becomes much less significant when your herbs are getting enough light. And almost every other thing you do right becomes irrelevant if they aren’t.
Herbs are sun-lovers by nature. Most culinary herbs evolved in Mediterranean climates — think hot, bright, relatively dry conditions. Indoors, recreating that environment means prioritizing your sunniest window. In the northern hemisphere, that means south-facing windows get the most light year-round. West-facing windows are a reasonable second, particularly in summer when the afternoon sun is strong.
A genuinely useful rule: if you can comfortably read a book by the natural light in a spot during the middle of the day without turning on a lamp, your herbs will likely manage there. If you need artificial lighting to see clearly, you’ll need a grow light. To understand the broader concept of light intensity as it affects plants, our guide on understanding full sun vs partial shade breaks it down in practical terms.
Pick the Right Containers — Drainage Is Non-Negotiable
The container you choose has a surprisingly large impact on your herb’s health — not because of aesthetics, but because of drainage and moisture retention. The most important rule: every herb pot must have at least one drainage hole at the bottom. Without it, excess water accumulates in the soil, the roots sit in a permanently moist environment, and root rot follows almost inevitably, especially for Mediterranean herbs like rosemary, thyme, and oregano.
Size matters too. Most individual herbs do well in 4–6 inch pots when starting out. Mint is an exception — it spreads aggressively and is happier in a wider, shallower container, or even a dedicated hanging basket. Rosemary eventually needs an 8–10 inch pot as it matures. For a deeper dive into matching container size to plant needs, see our guide on how to choose the right pot size for plants.
Material-wise, terracotta is the gold standard for most herbs, especially the Mediterranean varieties. It’s porous, so it breathes, and it pulls excess moisture away from the soil — mimicking the well-drained, rocky conditions these herbs evolved in. Plastic pots retain moisture longer, which can suit mint, parsley, and basil, but can be problematic for thyme, oregano, and rosemary if you water on a schedule rather than reading the soil.

Terracotta Herb Pots with Saucers (6-Pack)
Classic 4-inch terracotta pots with matching drip trays — perfect drainage for basil, thyme, rosemary, and more.
Shop on AmazonSelect the Right Soil Mix — Not All Potting Mix Is Equal
The soil you choose is essentially your herb’s entire world — its source of nutrients, moisture, and structural support. The wrong choice can doom an otherwise well-positioned, well-watered plant. The right choice can make an average setup perform exceptionally.
For most herbs, the ideal growing medium is a high-quality potting mix amended with perlite (the small white volcanic glass pieces you’ve likely seen in bags of compost). A ratio of roughly 2 parts potting mix to 1 part perlite creates a free-draining medium that holds just enough moisture between waterings while preventing waterlogging. For a comprehensive breakdown of what makes a good indoor growing medium, our guide on the best potting soil mix for indoor plants is an excellent companion to this one.
Never use garden soil in pots. It compacts badly, drains poorly, and often contains insects, weed seeds, or disease. Even very good garden soil becomes a poor growing medium the moment it goes into a container.
🌿 Soil Preferences by Herb Type
- Mediterranean herbs (thyme, rosemary, oregano): Lean, gritty, fast-draining mix. Increase perlite to 40%. Slightly alkaline pH (6.5–7.0).
- Moisture-loving herbs (mint, parsley, basil): Richer mix with more organic matter. Standard potting mix with 20% perlite works well.
- Cilantro: Prefers deep, neutral soil. Use a deeper pot to accommodate its taproot and reduce bolting.
- Chives: Very tolerant. Standard potting mix with modest perlite addition suits them well.
Plant Your Herbs — Seeds, Seedlings, or Supermarket Rescues
You have three main starting options, each with its own rhythm and advantages. Understanding which suits your situation makes the difference between a fast, satisfying start and a frustrating wait.
Starting from seed is the most satisfying and economical approach if you’re growing multiple plants of the same herb. Sow seeds on the surface of moist potting mix, cover very lightly (most herb seeds need light to germinate), and keep the soil consistently moist until germination. Use a plastic wrap or dome to retain humidity during those first days. Basil typically germinates in 5–7 days; parsley can take two to three weeks — be patient.
Buying nursery starts (young plants from a garden center) gives you a head start of several weeks. These plants already have established root systems and should adapt to their new home within a week or two. When transplanting, handle the root ball gently and don’t bury the stem deeper than it was growing in its original container.
Supermarket herbs are an underrated starting point. Those small pots of basil or coriander sold in grocery stores actually contain multiple seedlings crammed together — typically four to eight individual plants sharing one very small pot. The trick is to gently tease them apart and repot each small cluster (two or three seedlings) into its own proper-sized container with fresh potting mix. Done correctly, you’ll turn one £1.50 supermarket pot into four or five thriving herb plants.
Water Correctly — The Skill That Separates Thriving Plants from Dead Ones
More indoor herbs die from overwatering than from any other cause. This is worth repeating: overwatering is the number one killer of potted herbs, and it’s completely counterintuitive, because the plant looks just as unhappy when it has too much water as when it has too little — wilted, yellowing, struggling. The difference is invisible at soil level until it’s too late.
The most reliable watering method for any herb: push your finger about an inch (2–3 cm) into the soil. If it feels dry at that depth, water thoroughly — meaning water until it runs freely from the drainage hole. Then wait. Don’t water again until that top inch is dry again. This approach is sometimes called “deep and infrequent” watering, and it encourages roots to grow deeper into the pot in search of moisture, making plants more robust and resilient.
When you do water, water at soil level rather than on the leaves. Wet foliage in a less ventilated indoor environment creates ideal conditions for fungal disease and can also attract the fungus gnats we’ll discuss in the troubleshooting section. If you’re already noticing tiny flies around your herbs, our guide on how to get rid of fungus gnats naturally covers the most effective solutions without reaching for chemical pesticides.
The clearest signs of watering problems are covered in detail in our article on signs of overwatering vs underwatering — it’s one of the most important reads for any indoor gardener because the two conditions look deceptively similar on the surface.
Feed and Fertilize — Gently and Seasonally
Here’s the thing about fertilizing herbs indoors: less is genuinely more. Many beginners (and even experienced gardeners) over-fertilize, which pushes plants to produce an abundance of lush green leaves at the expense of the essential oils that give herbs their flavor and fragrance. A heavily fertilized basil plant looks impressive but tastes of almost nothing.
A half-strength liquid organic fertilizer applied every two to three weeks during the active growing period is sufficient for most potted herbs. In winter, when light levels drop and growth slows significantly, you can stop fertilizing almost entirely — herbs don’t need feeding when they’re not actively growing. For a complete walkthrough of indoor plant feeding schedules, our article on how and when to fertilize house plants provides excellent context that applies equally to herbs.
Note that some herbs — particularly the Mediterranean varieties like thyme, rosemary, and oregano — actually prefer lean soil. These plants evolved in nutrient-poor rocky terrain, and feeding them too richly produces lush, soft growth that’s less aromatic and more susceptible to disease.

Organic Liquid Seaweed Fertilizer
Gentle, balanced nutrition for culinary herbs. Promotes flavor-packed growth without over-stimulating foliage. Dilute to half-strength for best results.
Shop on AmazonHarvest Without Harming — The Technique That Keeps Plants Producing
This is the step most beginners get wrong, and it’s the one that has the biggest impact on longevity. Harvesting herbs correctly doesn’t just get you leaves to use in the kitchen — it actively encourages the plant to grow more, become bushier, and produce more heavily over time. Incorrect harvesting — taking too much, or harvesting from the wrong places — stunts growth or kills the plant.
The fundamental rule: always harvest from the top, cutting just above a leaf node (the point where a leaf joins the stem). This triggers the plant to produce two new shoots from that node, effectively doubling the growing tips and making the plant bushier. A basil plant harvested this way from the top becomes wider and more productive with each cutting.
The reverse approach — stripping leaves from the lower stem while leaving the top intact — encourages the plant to bolt (go to flower and seed), especially in basil and cilantro. Once a plant flowers, it redirects all energy into seed production, the leaves become smaller and less flavorful, and the plant’s kitchen value drops dramatically. Pinch off any flower buds the moment you see them.
🌿 The One-Third Rule
Never harvest more than one-third of the plant’s total growth in a single session. Taking more than this puts the plant under significant stress and slows recovery. Harvest little and often — you’ll end up with far more total herb over the season than if you take large amounts infrequently.
The only exception to the top-down rule is chives, which you can cut straight across at about an inch from the base and they’ll simply regrow from the bottom like grass. They’re wonderfully low-maintenance in this regard.
Grow Lights for Indoor Herbs — When and What to Buy
If your home has limited natural light — north-facing windows, rooms shaded by buildings or trees, or particularly dark winter months — a grow light can be the difference between barely-surviving herbs and genuinely thriving ones. Modern full-spectrum LED grow lights are energy-efficient, low-heat, and have come down dramatically in price over recent years.
The key specifications to understand when choosing a grow light for herbs:
| Grow Light Type | Best For | Light Spectrum | Energy Use | Heat Output | Cost |
|---|---|---|---|---|---|
| Full-spectrum LED panel | All herb types, multiple pots | Full (380–750nm) | Low | Very low | $$ |
| LED grow bulb in standard lamp | 1–3 pots, smaller setups | Full spectrum | Very low | Minimal | $ |
| Clip-on grow light | Individual plants, shelves | Red/blue or full | Low | Low | $ |
| T5/T8 fluorescent tube | Seedlings, propagation | Broad spectrum | Medium | Moderate | $$ |
| HID / HPS lamp | Large setups only | Partial | High | High | $$$ |
For most indoor herb garden setups, a full-spectrum LED panel positioned 6–12 inches above the plants, running for 14–16 hours per day, provides excellent results. Most modern LED grow lights include a timer function, which makes this effortless to manage.

Full-Spectrum LED Grow Light with Timer
Compact panel with built-in 14/16 hour timer — perfect for 4–8 herb pots. Energy efficient and low-heat, safe for kitchen or countertop use.
Shop on AmazonTroubleshooting Common Indoor Herb Problems
Even with good practices, indoor herbs can encounter problems. The most important skill is learning to read what your plants are showing you — leaves and stems communicate quite clearly once you know the language.
| Symptom | Most Likely Cause | Fix |
|---|---|---|
| Yellow leaves (lower stem) | Overwatering / root rot | Let soil dry fully; check drainage holes are clear; repot if root rot is advanced |
| Yellow leaves (upper stem) | Nutrient deficiency | Apply half-strength liquid fertilizer; consider fresh potting mix |
| Leggy, stretched growth | Insufficient light | Move closer to window or add grow light; rotate plant regularly |
| Brown leaf tips | Low humidity or underwatering | Place tray of pebbles and water near plant; mist lightly; check soil moisture |
| Wilting with moist soil | Root rot (overwatering damage) | Examine roots; trim brown roots; repot in fresh mix with extra perlite |
| Tiny flies hovering over soil | Fungus gnats (overwatering) | Allow soil to dry more between waterings; sticky yellow traps; neem oil drench |
| White crusty deposit on pot/soil | Mineral buildup from tap water | Flush thoroughly with water; switch to filtered or rainwater |
| Bolting (sudden flower stems) | Heat, stress, or end of plant cycle | Pinch flowers immediately; keep basil away from heat sources; sow fresh seeds |
Fungus gnats deserve a special mention because they’re disproportionately common in indoor herb gardens. They’re not actually harmful to established plants in small numbers, but their larvae can damage seedling roots, and an infestation makes your growing space unpleasant. The most effective long-term solution is simply allowing the top inch of soil to dry between waterings — the larvae can’t survive in dry conditions. For a comprehensive treatment plan, our detailed guide on natural fungus gnat control covers everything from sticky traps to neem oil soil drenches.
Indoor Herb Comparison: Complete Growing Guide
Use this at-a-glance reference to understand the key needs of each herb before deciding which ones to grow. The ideal starting collection for most people is basil, chives, and mint — fast, forgiving, and versatile in the kitchen.
| Herb | Light Needed | Water Needs | Ideal Temp | Difficulty | Time to Harvest | Notes |
|---|---|---|---|---|---|---|
| Basil | Full sun (6+ hrs) | Moderate | 20–28°C | ⭐⭐ | 3–5 weeks from seed | Hates cold drafts; pinch flowers constantly |
| Chives | Medium (4+ hrs) | Moderate | 15–24°C | ⭐ | 3–4 weeks from seed | Cut to 1″ from base; regrows reliably |
| Mint | Medium (4+ hrs) | Moderate/High | 15–22°C | ⭐ | 2–3 weeks from cutting | Very vigorous; keep in own pot; spreads aggressively |
| Parsley | Medium (4–6 hrs) | Moderate | 15–22°C | ⭐⭐ | 5–8 weeks from seed | Slow to germinate; worth starting with transplants |
| Thyme | Full sun (6+ hrs) | Low | 18–26°C | ⭐⭐ | 3–5 weeks from cutting | Drought tolerant; excellent drainage essential |
| Rosemary | Full sun (6–8 hrs) | Low | 18–28°C | ⭐⭐⭐ | 6+ months from seed | Slow grower; buy established plant; excellent air purifier |
| Oregano | Full sun (6+ hrs) | Low | 18–26°C | ⭐⭐ | 3–4 weeks from transplant | Like thyme, thrives on neglect; very drought tolerant |
| Cilantro | Medium/High | Moderate | 15–22°C | ⭐⭐⭐ | 3–4 weeks from seed | Bolts easily; sow successively every 2–3 weeks; use deep pot |
| Lemon Balm | Medium (4+ hrs) | Moderate | 15–22°C | ⭐ | 4–6 weeks from seed | Wonderful fragrance; repels insects; great for teas |
| Sage | Full sun (6+ hrs) | Low/Moderate | 18–24°C | ⭐⭐ | 2–3 weeks from established plant | Beautiful silvery foliage; good air purifier; buy as transplant |
You might also be interested in combining your herb garden with other edible plants in pots. Our guides on the easiest vegetables to grow in pots and even growing tomatoes on a balcony make excellent companion reading — many of the skills you develop growing herbs transfer directly to these projects.

Soil Moisture Meter (3-in-1)
Takes the guesswork out of watering. Measures moisture, light level, and pH — essential for keeping thyme, rosemary, and basil in their ideal range.
Shop on AmazonBeyond the Basics: Advanced Tips for a Thriving Herb Collection
Propagating Herbs from Cuttings
Once you have established herb plants, you can multiply them for free through stem cuttings — a technique that works exceptionally well with mint, basil, thyme, rosemary, and sage. Take a healthy stem cutting of about 3–4 inches, remove the lower leaves, and place the stem in a glass of water on a bright windowsill. Within one to three weeks, you’ll see roots develop from the nodes below the waterline. Once the roots are an inch or more long, pot the cutting into fresh growing mix. This is also an easy way to gift herbs to friends or extend your collection without any additional seed cost.
Creating a Windowsill Microclimate
You can meaningfully improve the growing conditions on a windowsill through a few simple interventions. Placing a reflective white board or a sheet of aluminum foil on the side of the plants away from the window bounces light back onto the shaded side, improving light distribution. Grouping several herb pots together raises local humidity as plants transpire — beneficial for basil, which struggles in very dry indoor air. If you’re interested in plants specifically chosen for air quality improvement, our article on indoor plants that purify the air highlights several herbs alongside other popular options like rosemary and lavender.
Growing Herbs from Seeds vs. Cuttings vs. Microgreens
If you’re experimenting with different growing formats, it’s worth knowing that many herbs can be grown as microgreens — harvested at the seedling stage rather than as mature plants. Basil microgreens, for example, are ready in just 7–10 days and have an intensely concentrated flavor. For a complete guide to this fast-growing format, see our article on growing microgreens at home without soil.
Pairing Your Herb Garden with Vegetables
An indoor herb garden is often the first step toward a broader edible indoor setup. If you’ve been exploring how to start a garden from scratch or you’re building on apartment gardening experience from our balcony gardening ideas guide, you’ll find that herbs and vegetables grown together create a genuinely productive and beautiful indoor growing space.
Seasonal Rhythm and Plant Replacement
Even well-cared-for herb plants have natural lifespans. Annual herbs like basil and cilantro will complete their lifecycle within a season and need replacing. Perennial herbs — rosemary, thyme, sage, mint — can last several years with good care, though they may become woody and less productive over time and benefit from division or propagation renewal. Building a habit of starting new seeds every few months, particularly of basil and cilantro, ensures you always have productive plants on hand.
Frequently Asked Questions
How much sunlight do indoor herbs actually need?
Most culinary herbs need a minimum of 4–6 hours of bright, direct or indirect sunlight per day. Full-sun herbs like basil, rosemary, thyme, and oregano want 6–8 hours and perform best in south-facing windows. More shade-tolerant herbs like mint, parsley, chives, and lemon balm can manage with 4 hours of bright indirect light. Below that threshold, a full-spectrum grow light is the most practical solution.
Can I grow herbs indoors without any natural light?
Yes, with a full-spectrum LED grow light. Modern grow lights replicate the wavelengths plants use for photosynthesis effectively enough that herbs grow robustly without any natural light at all. Run the light for 14–16 hours per day and position it 6–12 inches above the plant canopy. This is how many serious indoor gardeners grow year-round, regardless of window orientation.
Why do my supermarket herb plants always die?
Supermarket herb plants are sold overcrowded — they typically contain 6–10 individual seedlings in a pot designed for one or two plants. This intense overcrowding, combined with the pot being too small and the plants being grown in controlled greenhouse conditions, means they struggle immediately in a typical home environment. The solution is to divide them: gently separate the root ball into smaller clusters of 2–3 seedlings and repot each cluster into its own 4–6 inch pot with fresh potting mix. Water well, give them good light, and they’ll establish quickly.
How often should I water my indoor herbs?
There’s no universal schedule because it depends on the herb, pot size, soil type, temperature, and light levels. The reliable method is the finger test: push a finger an inch into the soil. If it feels dry, water thoroughly until it drains from the bottom. If it still feels moist, wait another day and test again. Mediterranean herbs (rosemary, thyme, oregano) prefer to dry out more between waterings than moisture-loving herbs (mint, parsley, basil). On average, most indoor herbs need watering every 2–4 days in summer and every 4–7 days in winter.
What is the easiest herb to grow indoors for a complete beginner?
Chives are arguably the most forgiving indoor herb — they tolerate lower light than most, don’t mind irregular watering, and regenerate quickly after harvesting. Mint is a close second for reliability, though it needs its own container to prevent it from taking over. For culinary impact combined with ease, basil rewards beginners quickly with a fast growth rate, though it needs the brightest spot in the house. A starter trio of chives, mint, and basil covers a range of kitchen uses and different growing conditions.
Do I need special potting mix for herbs?
You don’t need a specifically labeled “herb mix,” but you do need a well-draining mix. A quality general potting mix amended with 20–30% perlite works excellently for most herbs. For Mediterranean herbs (rosemary, thyme, oregano, sage), increase the perlite to 35–40% to replicate their naturally lean, rocky, fast-draining growing conditions. Never use garden soil in containers — it compacts, drains poorly, and often introduces pests and diseases.
Why do my herb plants keep bolting (going to flower)?
Bolting is a plant’s natural response to stress — heat, drought, long daylight hours, or simply reaching maturity. For basil and cilantro, the most common causes indoors are heat stress from being placed near a radiator or oven, or the plant simply completing its annual cycle. The solution is to pinch off flower buds the moment they appear. For cilantro specifically, keep the plant in a cooler location (below 22°C) and sow new seeds every 2–3 weeks rather than trying to prolong a single plant indefinitely.
What causes the tiny flies around my herb pots?
Those are almost certainly fungus gnats — small flies whose larvae live in moist potting soil and feed on organic matter. They’re attracted by consistently wet soil conditions, which is why they’re so common in herb gardens where beginners tend to overwater. The most effective control strategy is allowing the soil to dry more thoroughly between waterings, since the larvae can’t survive in dry conditions. Yellow sticky traps catch the adult gnats and reduce populations quickly. For persistent infestations, a neem oil soil drench or beneficial nematodes are highly effective biological controls.
Can herbs be grown together in the same pot?
Yes, with important caveats. Group herbs with similar water and light needs together. Mediterranean herbs (thyme, oregano, rosemary, sage) grow well together because they all prefer dry conditions and full sun. Moisture-loving herbs (basil, parsley, cilantro) can share pots reasonably well. Mint, however, should always have its own container — it’s aggressively invasive and will crowd out any neighboring plants. Avoid mixing Mediterranean herbs (which need dry soil) with moisture lovers in the same pot, as you can’t satisfy both simultaneously.
How do I harvest basil without killing the plant?
The key is to always harvest from the top of the plant, cutting just above a pair of leaves where the stem forks. This stimulates two new growth points to develop from that node, making the plant fuller and more productive over time. Never strip leaves from the lower stem — this causes the plant to bolt. Pinch off any flower buds immediately when you see them forming. The plant will stay productive for months if you harvest this way consistently, taking no more than one-third of the plant’s growth at any one time.
Is it better to grow herbs from seeds or buy plants?
Both approaches have their place. Growing from seed is significantly cheaper if you want multiple plants, gives you access to far more variety, and is deeply satisfying — but it requires patience, particularly for slow-germinators like parsley (2–3 weeks) and rosemary (several weeks with unreliable germination). Buying established plants from a nursery gets you to harvest in days rather than weeks and suits anyone wanting immediate results. The practical middle ground for most beginners is buying two or three established plants to start using immediately while sowing seeds in parallel to build up a larger, cheaper collection over the following weeks.
How do I keep rosemary alive indoors?
Rosemary is a Mediterranean shrub that evolved in hot, bright, dry conditions — and it struggles with the opposite of all three indoors. Give it the sunniest window you have, in a terracotta pot with very free-draining soil (50% potting mix, 50% perlite). Water only when the soil is completely dry — rosemary is extremely susceptible to root rot. Ensure good air circulation; it dislikes stuffy indoor air. In winter, move it as close to the window as possible and reduce watering further. Rosemary is slow-growing indoors but very long-lived when its needs are met.
Putting It All Together
Starting an indoor herb garden is one of the most immediately rewarding growing projects you can take on. Within weeks — sometimes days — of setting up your first pots, you’ll have fresh herbs to cook with, a more fragrant home, and the satisfying knowledge that you’ve created something living and productive from very little.
The steps we’ve covered work together as a system: the right location provides the light your herbs need to photosynthesize; the right containers give their roots the drainage to stay healthy; the right soil mix holds moisture without drowning roots; correct planting technique gives seedlings the best possible start; mindful watering prevents the single most common cause of herb death; gentle feeding maintains nutrition without overwhelming flavor; and proper harvesting keeps plants producing for months rather than weeks.
Don’t let perfect be the enemy of started. Pick two or three herbs, find your sunniest window, get them into decent pots with good draining mix, and begin. The instincts develop quickly with real plants in front of you. And if you want to expand from herbs into a broader growing setup, our comprehensive guide on how to start a garden from scratch is a natural next step — along with the entire gardening at home resource library.
Your herb garden won’t just make your cooking better. It’ll change the way you think about the plants around you — and that’s where the real adventure in gardening begins.
Ready to Start Your Indoor Herb Garden?
Get everything you need in one place — from starter kits and terracotta pots to grow lights and organic fertilizer. Your freshest cooking is just a few weeks away.
🌿 Shop Indoor Herb Garden Essentials