How to Clean a Lawn Spreader: The Ultimate Step-by-Step Guide for Long-Lasting Equipment
If you’ve ever pulled your trusty lawn spreader out of the garage in the spring only to find the gears jammed, the axle rusted, and the hopper caked in white crust, you are not alone. Knowing exactly how to clean a lawn spreader is the single most important maintenance task for any homeowner or landscaping professional. Fertilizers, weed control granules, and ice melt are highly corrosive chemical compounds. Left unattended, they will destroy plastics, rapidly oxidize metals, and ruin the calibration of your equipment.
In this massive, comprehensive guide, we are leaving no stone unturned. We will cover the exact step-by-step methods to completely clean broadcast, drop, and tow-behind spreaders. If you want to learn how to use a broadcast spreader effectively, it all starts with equipment that functions like it just came out of the box.
1. Why Cleaning Your Lawn Spreader is Non-Negotiable
Understanding the chemistry behind lawn care products reveals exactly why a dirty spreader is a doomed spreader. Most modern lawn fertilizers are composed of nitrogen, phosphorus, and potassium (NPK). These compounds are essentially heavy salts. When these salts pull moisture from the ambient humidity in your shed or garage, they form a highly corrosive paste.
When you are learning how to spread grass seed evenly, the precision of your hopper’s drop holes and the smooth rotation of your impeller are critical. A buildup of dried fertilizer will restrict the drop holes, meaning a setting of “5” might only deliver a setting of “2” worth of product. This leads to patchy lawns, wasted money, and endless frustration.
Furthermore, cross-contamination is a massive risk. If you use your spreader to apply a broadleaf weed killer, fail to clean it, and then use the same spreader to apply grass seed while learning how to overseed a lawn with a spreader, you will inadvertently kill the new germinating seeds.
| Product Left in Spreader | Chemical Reaction / Danger | Long-Term Result on Equipment |
|---|---|---|
| Synthetic Fertilizer (Nitrogen/Salts) | Draws moisture, oxidizes metal rapidly. | Rusted axles, seized gears, brittle plastic. |
| Pre-emergent Herbicides | Leaves toxic residue inside hopper walls. | Cross-contamination kills future seeds. |
| Ice Melt / Rock Salt | Extreme galvanic corrosion on all metal. | Total structural failure of the wheel base. |

Prevent Spreader Rust Instantly
After cleaning, protect your spreader’s axle and gears with this top-rated anti-corrosion barrier spray. Extends equipment life by years.
Check Price on Amazon2. Pre-Cleaning Preparation and Safety Gear
Before water ever touches your equipment, preparation is key. Washing fertilizer down a driveway and into a storm drain is not just bad for the environment—it can lead to localized algae blooms in nearby water systems. Always plan to wash your spreader over a patch of established lawn or garden bed that can benefit from the highly diluted residual nutrients.
Safety first: Agricultural chemicals and fertilizers contain dust particulates that become airborne when agitated. When brushing out a dry spreader, wear a standard N95 particulate mask and protective safety goggles. Nitrile gloves will keep chemical dyes and salts from drying out your hands.
3. Gathering Your Essential Cleaning Supplies
You don’t need expensive specialized chemicals to get your spreader looking factory new. The best tools are likely already sitting in your garage. Here is the ultimate checklist for a deep clean:
- Stiff-bristled nylon brush: Essential for sweeping out dry granules without scratching the hopper plastic.
- Garden hose with adjustable nozzle: Avoid high-pressure power washers, which can strip paint and force water into sealed gearboxes.
- Mild dish soap (pH neutral): Helps break down the binding agents found in synthetic fertilizers.
- Microfiber towels or an air compressor: To completely dry the metal components.
- WD-40, White Lithium Grease, or Silicone Spray: Essential for post-wash lubrication.
- Putty knife (plastic): To gently scrape away hardened, caked-on fertilizer at the bottom of the hopper.
4. Step-by-Step Guide: How to Clean a Broadcast Spreader
We have arrived at the core of the process. Whether you own a small push model or something robust, these sequential steps guarantee a flawless clean. If you are working with a highly rated model, like the ones detailed in this Earthway 2050P 80lb broadcast spreader review, proper maintenance will easily make the unit last a decade.
Step 1: Empty the Hopper Completely
Never add water to a hopper that still contains product. Water will turn fertilizer dust into a thick, cement-like slurry that will instantly clog your drop holes and stick to the impeller plate. Open the flow control mechanism to its maximum setting. Tip the spreader forward over a bucket or original product bag to dump out any remaining granules.
Step 2: Dry Brushing and Scraping
Once the loose granules are out, take your stiff-bristled nylon brush and vigorously sweep the inside of the hopper. Pay special attention to the corners and the flow-control gates at the very bottom. If you notice caked-on residue (often white, chalky, or brown depending on the product), gently chip it away with a plastic putty knife. Do not use a metal screwdriver, as gouging the plastic will create grooves where future fertilizer will stick.
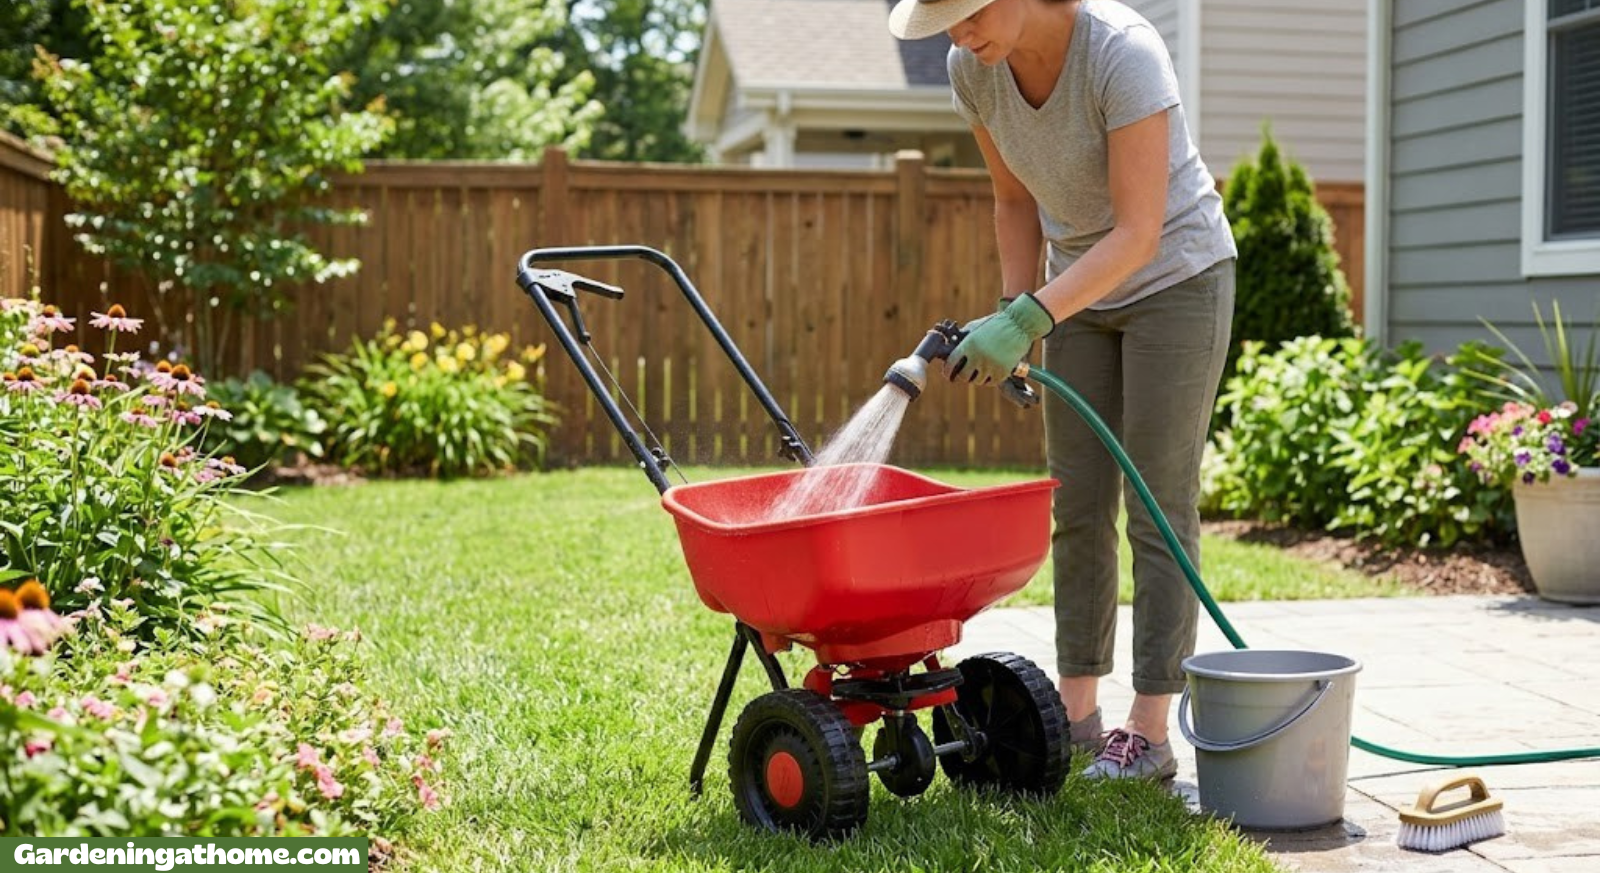
Step 3: Washing the Hopper and Deflector
Move the spreader to your designated wash area (preferably over grass). Open the flow control wide open. Use your garden hose on a “shower” or “flat” setting to thoroughly rinse the inside of the hopper. Add a squirt of pH-neutral dish soap to break down oily residues left by weed-and-feed products. Rinse until the water flowing out of the bottom runs completely clear.
Step 4: Cleaning the Axle, Gears, and Impeller Wheels
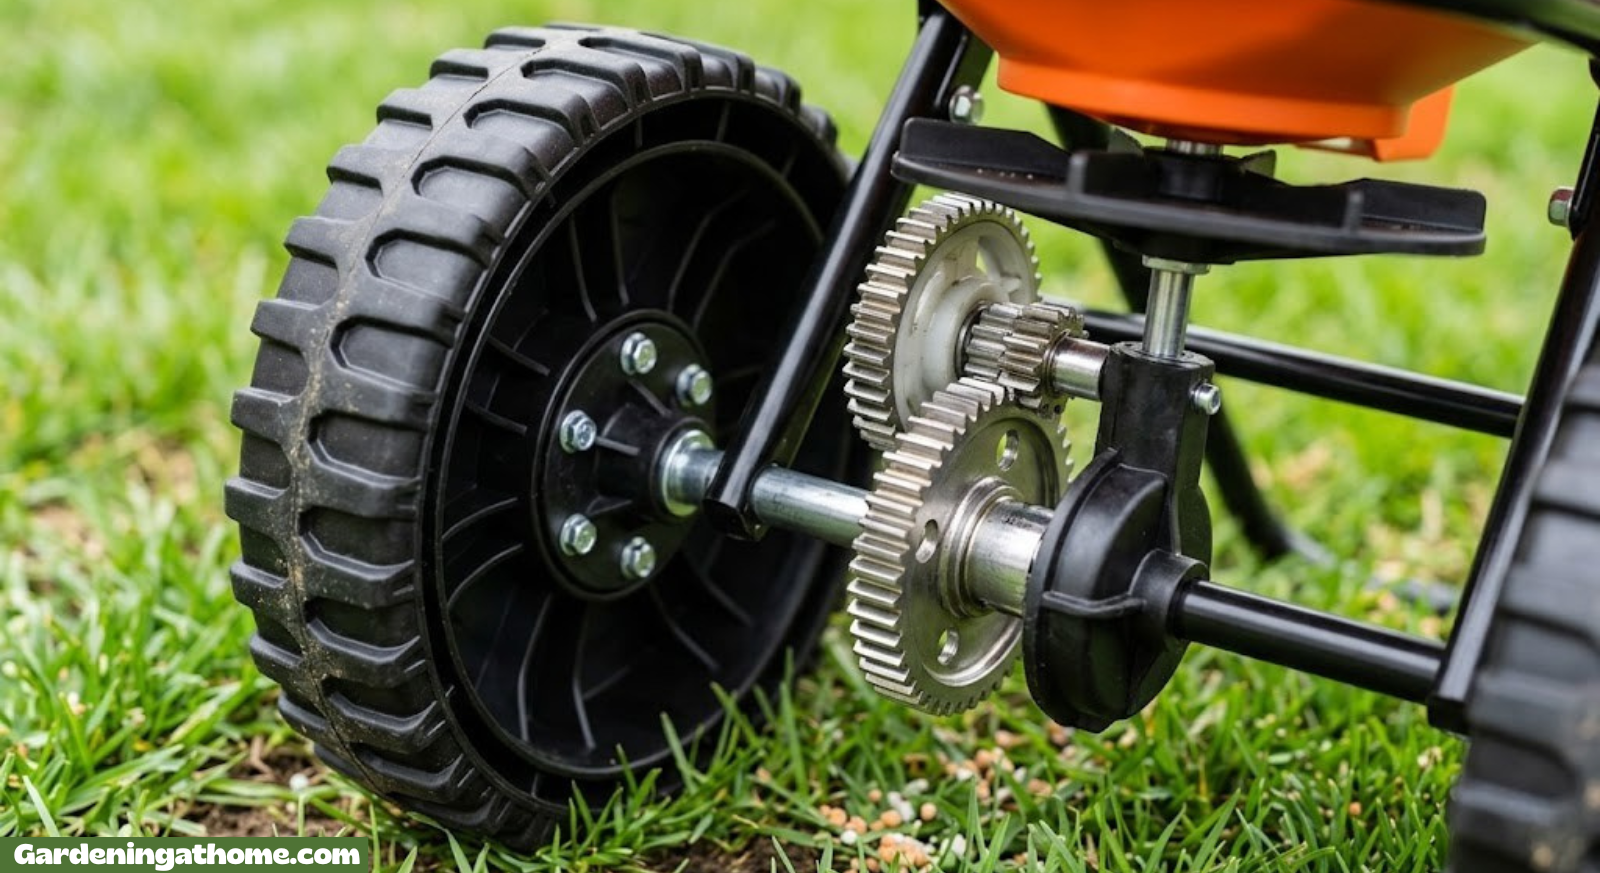
The impeller (the spinning disc under the hopper that broadcasts the seed) takes a massive beating. Direct your hose under the hopper to flush out the impeller plate. Next, inspect the main steel axle and the gearbox. Use a smaller brush (an old toothbrush works wonders) to scrub away any trapped debris surrounding the gear housing. If your spreader has pneumatic tires, wash the rubber treads and the metal or plastic rims.
Step 5: Drying the Spreader Thoroughly
Skipping this step is the number one reason lawn spreaders fail. Water is the catalyst for rust. If you put a wet spreader in a dark, humid shed, the axle will seize by next season. Wipe down the entire unit with microfiber towels. If you have an air compressor or a leaf blower, use it to blast trapped water out of the gear crevices, hollow tubular handles, and wheel hubs. Leave the spreader in direct sunlight for 2-3 hours to guarantee complete evaporation.
Step 6: Lubricating the Moving Parts
Cleaning removes protective factory oils along with the dirt. You must replace them. Apply a light coat of WD-40, silicone spray, or white lithium grease to the main axle, the wheel bearings, the flow-control cable pivot points, and the internal gears (if accessible). Spin the wheels manually to work the lubricant deep into the gear teeth. Wipe away any excess drips, as wet oil will attract dust and create a sludgy buildup next time you use it.

Best Spreader Gear Lubricant
Standard WD-40 evaporates. Use a dedicated dirt-resistant Silicone spray to keep your spreader’s axle and gears spinning flawlessly without attracting dust.
Check Price on Amazon5. How to Clean a Drop Spreader (Key Differences)
Drop spreaders require a slightly different approach than broadcast spreaders. Instead of an impeller disc, a drop spreader relies on a long agitator bar that runs the entire width of the hopper, pushing fertilizer out of a row of small holes across the bottom.
The Danger Zone: The primary failure point on a drop spreader is the agitator bar rusting to the hopper bottom. When washing a drop spreader, you must open the bottom plate entirely. Use your garden hose to blast water straight through the top and out the bottom slit. Ensure you rotate the wheels back and forth during the washing process; this forces the agitator bar to move, allowing trapped granules to wash free.
Drying is doubly important here. Tilt the drop spreader upside down in the sun so water drains away from the wheel bearings. Lubricate the entire length of the agitator bar with a dry Teflon spray to prevent rust without creating a sticky surface.
6. Cleaning Liquid & Tow-Behind Spreaders
If you have upgraded your lawn care arsenal, you might be wondering how to maintain larger equipment. Those using heavy-duty rigs like the ones mentioned in our Agri-Fab Pull-Behind Broadcast Spreader Review must be diligent. Tow-behind units have larger, enclosed gearboxes that must not be flooded with high-pressure water.
Liquid Sprayers/Spreaders
For liquid spreaders, triple-rinsing is the gold standard:
- Fill the tank 1/4 full with clean water, shake vigorously, and spray it out over a safe area.
- Fill again with water and a neutralizing agent (like a specialized tank cleaner or diluted ammonia if washing out herbicides), and spray through the nozzles.
- Perform a final rinse with pure, clean water. Remove the nozzle tips and mesh screens and soak them in warm soapy water.
7. Troubleshooting Common Spreader Cleaning Issues
Even with regular maintenance, you might encounter stubborn issues. Here is how to conquer the most common problems found during the cleaning process.
| Problem | Likely Cause | Expert Solution |
|---|---|---|
| Gears are completely seized | Rust buildup inside the gearbox or on the main axle. | Soak heavily in penetrating oil (like PB Blaster) for 24 hours. Gently tap the axle with a rubber mallet while rocking the wheels. |
| White crust won’t wash off plastic | Calcified fertilizer salts chemically bonded to the hopper. | Mix equal parts white vinegar and warm water. Let it soak for 15 minutes to dissolve the salts, then scrub with a stiff brush. |
| Flow control lever is stuck | Corrosion inside the control cable housing. | Drip a few drops of lightweight machine oil down the top of the cable housing. Work the lever back and forth slowly to distribute. |
| Impeller spins unevenly | Debris wrapped around the impeller shaft (e.g., twine, tall grass). | Tip the spreader back. Use needle-nose pliers and a utility knife to carefully cut and pull away wrapped debris. |
8. Preventing Rust and Corrosion in Metal Spreaders
While plastic hoppers don’t rust, the tubular steel frames, axles, and cotter pins certainly do. The secret to preventing rust is establishing a hydrophobic (water-repelling) barrier. After your spreader is perfectly clean and dry, consider applying a specialized marine-grade anti-corrosion spray or Fluid Film to all exposed metal parts.
Fluid Film contains lanolin, which creates an active, self-healing barrier that moisture and fertilizer salts cannot penetrate. Be cautious not to spray these thick lubricants inside the hopper where they will cause your granular products to clump and stick.

Ultimate Winterizing Protection
Fluid Film provides a lanolin-based coating that absolutely stops rust in its tracks. Spray on your spreader’s tubular frame before winter storage.
Check Price on Amazon9. Storage Best Practices After Cleaning
How you store your spreader is just as important as how you clean it. Never store your spreader outdoors exposed to the elements, as UV rays will rapidly degrade the plastic hopper, making it brittle and prone to shattering. When considering the best time to spread grass seed, you want your spreader ready to go immediately, not buried under a pile of damp garden hoses.
- Hang it up: The best storage method is hanging the spreader on a sturdy garage wall hook. This keeps the tires off the cold, damp concrete and prevents the frame from being accidentally bent or crushed.
- Release tension: Always store the spreader with the flow control lever in the “Open” position. This releases tension on the control spring, ensuring it doesn’t stretch out and lose accuracy over the winter.
- Cover it: If you must store it in a dusty shed, drape a heavy-duty trash bag or tarp over the hopper to keep spiders, mice, and dust from settling inside.
10. Signs Your Spreader is Beyond Cleaning (When to Replace)
Sometimes, despite your best efforts, a spreader reaches the end of its usable life. You should consider browsing for the best lawn seed spreader replacements if you notice any of the following fatal flaws:
- Cracked Hopper: If the plastic hopper is cracked, fertilizer will leak uncontrollably, burning lines into your lawn. Tape and epoxy rarely hold up against heavy loads.
- Stripped Gears: If you push the spreader and hear a clicking, grinding noise while the impeller fails to spin, the internal nylon or metal gears have stripped. Repairing this often costs as much as a new unit.
- Rusted-Through Frame: Surface rust is fine, but if the tubular steel handle or base frame is rusting all the way through and bending under the weight of a full hopper, it is an immediate safety hazard.
11. Calibration Check Post-Cleaning
Cleaning out gunk and lubricating the flow gates will fundamentally change how your spreader operates—usually for the better! However, this means your previous settings might now drop product too quickly. After a deep clean, it is imperative that you learn how to calibrate a spreader again.
To do a quick field calibration: Mark off a 100-square-foot area on your driveway. Fill the spreader with a small, weighed amount of product. Push the spreader over the area at your normal walking pace. Sweep up and weigh the dropped product to ensure it matches the manufacturer’s recommended application rate for that specific dial setting.
12. Expert Maintenance Schedule for Year-Round Performance
To avoid spending hours chiseling concrete-like fertilizer out of your hopper, adopt a proactive maintenance schedule. Here is the routine professional landscapers use to keep their gear running flawlessly day after day.
| Frequency | Maintenance Action | Time Required |
|---|---|---|
| After Every Use | Empty hopper completely. Quick dry brush to remove dust. Leave control gate open. | 2 Minutes |
| Monthly (During Season) | Hose out hopper. Wipe down axle. Quick spray of silicone lube on moving parts. | 10 Minutes |
| Mid-Season (Switching Products) | Wash with mild soap. Ensure zero cross-contamination between weed killer and grass seed. | 15 Minutes |
| End of Season (Winterization) | Full deep clean (Steps 1-6). Apply heavy rust inhibitor to frame. Store off ground. | 30 Minutes |
Frequently Asked Questions (FAQs)
Can I use a pressure washer to clean my lawn spreader?
No, it is highly discouraged. A high-pressure washer can easily strip the protective paint off the metal frame, blast water past the protective seals into the gearbox (causing internal rust), and gouge the plastic hopper. A standard garden hose with a spray nozzle provides plenty of pressure for cleaning.
Do I really need to wash it if I only used grass seed?
Grass seed is not corrosive like fertilizer, so you do not necessarily need to wash it with water. However, you absolutely must dry brush the hopper thoroughly. Leftover seed can attract mice and insects into your garage, and moisture in the air can cause old seeds to rot inside the spreader mechanism.
Is it safe to wash fertilizer down the driveway?
No. Washing fertilizer runoff down a driveway leads directly into storm drains, which flow into local rivers and lakes. This causes nitrogen pollution and massive algae blooms. Always wash your spreader over a patch of grass or a garden bed where the diluted nutrients can be safely absorbed by the soil.
What is the white crust inside my spreader?
The white crust is calcified salt from synthetic fertilizers. When fertilizer dust mixes with humidity in the air, it forms a paste that hardens like cement. You can dissolve this crust by soaking it in a mixture of warm water and white vinegar before scrubbing with a stiff brush.
Why are my spreader wheels locking up?
Wheel lock-up is usually caused by rust buildup on the main axle or dried fertilizer jamming the internal gearbox. Apply penetrating oil to the axle, let it sit for a few hours, and gently work the wheels back and forth until they free up. Follow up with a deep clean and silicone lubrication.
Can I use standard WD-40 to lubricate the gears?
Standard WD-40 is excellent for displacing water immediately after washing, but it evaporates relatively quickly and is not a long-term lubricant. It’s better to follow up with a dry silicone spray, white lithium grease, or a dry Teflon lubricant, as these won’t attract dust and dirt the way wet oils do.
How do I get rid of the chemical smell in the hopper?
If your spreader still smells like herbicide after washing, wash it again using a mixture of water and a few tablespoons of baking soda. Baking soda is a natural odor neutralizer. Let the mixture sit in the hopper for 20 minutes before rinsing it out thoroughly.
My spreader control lever is incredibly hard to push. How do I fix it?
The control cable likely has internal corrosion. Drip a few drops of lightweight oil (like 3-in-One oil) down the top of the cable housing. Manually open and close the bottom gate by hand while moving the lever to work the oil all the way down the cable line.
Can I store fertilizer inside the spreader between uses?
Absolutely not. Fertilizer naturally absorbs moisture from the air (it is hygroscopic). If left in the hopper, it will turn into a wet sludge that will clog the drop holes and rapidly rust any nearby metal components. Always pour leftover product back into its original bag and seal it tightly.
Where should I store my spreader during the winter?
Store your spreader in a dry, covered area like a garage or shed. Ideally, hang it on a wall hook to keep the wheels off cold, damp floors. Ensure the control lever is set to the “open” position to release tension on the internal spring mechanism.
Conclusion: A Clean Spreader is a Happy Lawn
Learning how to clean a lawn spreader isn’t just about making your tools look nice; it’s a fundamental requirement for achieving a lush, green, perfectly uniform lawn. By dedicating just 10 to 15 minutes after each use to empty, brush, wash, and lubricate your equipment, you are protecting your investment from the brutal realities of chemical corrosion.
Remember, the precision of your fertilizer application is only as good as the cleanliness of your flow gates and impeller. Keep it clean, keep it dry, and your spreader will serve you faithfully for seasons to come. If you realize your current equipment is too far gone, don’t let it ruin your lawn—check out our guide to the best lawn seed spreaders to find a worthy, rust-resistant replacement.

Time for an Upgrade?
If your old spreader’s gears are totally stripped or the frame has rusted through, upgrade to the top-rated Scotts Elite. Featuring a dual-rotor design and ergonomic handle for unmatched accuracy.
Check Price on Amazon